ETFmatic
This page contains the descriptions and the use cases of ETFmatic endpoints and their use cases.
Summary
ETFmatic is a pan-European provider of white-labelled and B2B2C robo-advisory technology and associated services. The platform's well-defined REST API lets you quickly and affordably incorporate our investment platform into your client offering.
Steps to Create and Fund an Investment Portfolio
Create a Client with proper information
Questionnaires fill up
Getting the Risk Profile
Create the Investment Account
Create the investment Portfolio
Fund the created portfolio
1. Create a Client with proper information
The first step of using ETFmatic services is to create a client with proper information. The following information is required to create a Client:
First Name and Last Name
Date of birth
Email
Phone number
Address
Country of birth
City of birth
Gender
Document type (verification purposes)
Document issuing country name
Tax Number
Tax Number Country
Most of the information will be available by default. Still, if there is any situation where the user does not have any information updated, they can also update the information to create the client.
Make a POST request to the below endpoint to create an investment user under etfmatic:
The previous request creates the investment user. But there might be a case where the required information is unavailable for the user. The API response will contain an error message if there is any unavailable information. A sample error message is shown below:
To fix this, make a PATCH request to the /v1/customers/me endpoint to update the required information.
2. Questionnaires Fill Up
After creating the investment account, the user will need to answer some questions related to investment which will create the risk profile for the next step. To get the questions, make a GET request to the following endpoint:
Get Questionnaires
GET {baseUrl}/v1/investment/etfmatic/questionnaire
A sample response is given below for a better understanding:
On the response, there is a questionType object that represents the type of the question. The types are shown below:
SINGLE_ANSWER : multiple-choice answer
FREEFORM_ANSWER : range value answer ( 0 - 100 )
aIdandqIdwill be “0” to “100”
Every question has some answers, and every answer will also contain some value. These answers need to be submitted by the user in a way that the system can assess their investment profile.
Filling the Questionnaires
The user might need some time to fill these up. That's why the server can save the answer as a draft before sending the answers to ETFmatic for assessment. Saving the answer does not submit them to ETFmatic for review. Make a PUT request to the following endpoint to save the user's answer to the questions.
Save Answer
PUT {baseUrl}/v1/investment/etfmatic/questionnaire/answers
A sample request body is given below for the previous request:
This request will save the answers; you can also get these saved answers by making a GET request. This request will help you to track how much the user has completed the form. The following is a response to the GET request:
3. Getting the Risk Profile and Completing Questionnaires
Getting Risk Profile
After completing all the questions, you can get the user's risk profile. The risk profile indicates how much the user would be willing to invest. There are weights in each question that adds up and assess the risk profile of the users. Ensure all the questions are marked to get the user's risk profile. After that, make a GET request to the following endpoint to the risk profile:
There are three types of risk profiles:
CONSERVATIVE
MODERATE
AGGRESSIVE
Completing Questionnaires
The questionnaire will be sent to ETFmatic. and then it’s not able to update answers anymore. Make a POST request to the below endpoint to submit the answers to ETFmatic:
Once the questionnaire has been done, ETFmatic will approve or reject it.
4. Create the Investment Account
The investment account will be created when ETFmatic approves the client. This account will be used to create a portfolio. Remember that this investment account is fully separated from the bank account. This account needs to be funded and operated separately.
Getting the investment account
After the questionnaires are done, and ETFmatic approves the submission, you can see the account details. To get the details of the investment account, make a GET request to the following endpoint:
A sample response is given below:
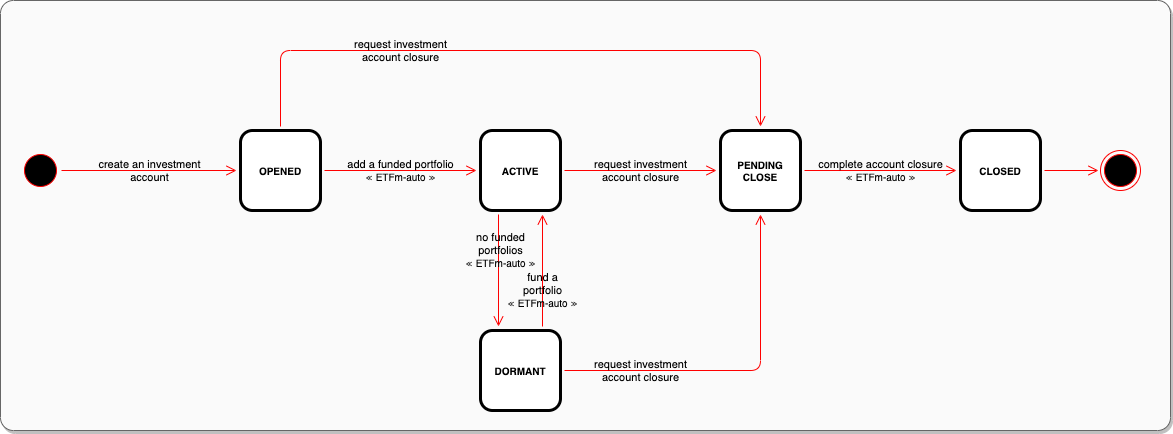
Account Status
Take a look at the status value of the account. This indicates the account status of the account. The account status has different types of value according to the state of the account. Have a look at the below image from the ETFmatic site for a better understanding:
The previous sample request has the status of "OPENED", which indicates that the account has just been created and is in the first stage. After the account is funded, it will turn to "ACTIVE", as shown in the attached flow chart.
5. Create the investment Portfolio
After the investment account is created, the next step is to create the portfolio. To make the portfolio, make a POST request to the following endpoint:
For the provider value, it should be "etfmatic", and the body should contain the following things:
account id
strategy
currency
name
Portfolio Strategies
There are Strategy types available that describe the investment types. For starters, it is easy to setup and offer clients a degree of control over the asset allocation in the portfolio. On the other hand, an adaptive strategy seeks long-term total returns with limited drawdown. The strategy achieves this by switching asset allocations from an aggressive to a defensive position and vice versa, according to a set of macroeconomic and logarithmic indicators.
A sample body of this request is given below:
The response to the request will contain the status "OK" if the operation is successful. That means that the portfolio is created.
Get Portfolio(s)
After the creation of the portfolio, users can get the available portfolio by making a GET request to the following endpoint:
Here, the provider value is "etfmatic".
Updating the Portfolio
Users can update their portfolios as well. They can update the name, currency and strategy after creating the Portfolio. To update a portfolio, make a PATCH request to the following endpoint:
The provider value should be "etfmatic", and the id value is the portfolio id. You can get the portfolio id from the GET request shown in the previous heading. A sample request body is given below:
Getting Portfolio Details
You can get the portfolio details by using the id of the portfolio. To get details of a portfolio, make a GET request to the following endpoint with the id of the portfolio:
Get Portfolio Details by Id
GET {baseUrl}/v1/investment/ETFMATIC/portfolioById/{id}
Path Parameters
| Name | Type | Description |
|---|---|---|
* | String | portfolio id |
6. Funding the Portfolio
Now that you have a portfolio, you have to fund it to make investments using the portfolio, of course. There are two steps to funding a portfolio. 1
Create Fund
Approve the created fund
1. Create a Fund
Creating a fund is simple, and it just has two simple pieces of information. A) Amount, B) If the fund is instant or not.
To create a Fund, make a POST request to the following endpoint:
Create Fund
POST /v1/investment/etfmatic/portfolios/{portfolio-id}/fund
Path Parameters
| Name | Type | Description |
|---|---|---|
portfolio-id* | String | To specify which portfolio |
Request Body
| Name | Type | Description |
|---|---|---|
amount* | String | number of amount that the portfolio is getting funded |
isInstant* | Boolean |
The returned id is the transfer id that would be required in the next step.
2. Approve the Created Fund
After the fund is created, you are going to have to approve it with your bank account. Make a POST request to the following endpoint, and in response, you will get a consentUrl that you have to visit if consent is required.
Approve Fund
POST /v1/investment/etfmatic/portfolios/{portfolio-id}/fund/{transfer-id}}/approval
Path Parameters
| Name | Type | Description |
|---|---|---|
portfolio-id* | String | Id of the portfolio |
transfer-id | String | Id of the transfer that is returned on the previous request |
By visiting the consent URL link, the user can approve the fund.
Top Up
The process of adding funds and top-up is the same. The process contains the vary two steps shown above. After the top-up is successfully added, the amount will be added to the investment.
Withdraw Funds
Users can withdraw funds from the portfolio as well. To keep the portfolio open, the user can withdraw up to 90% of its current value. The withdrawal amount will be transferred to the attached bank account connected to the investor account.
Withdrawing 100% of the fund will close the portfolio.
After the request has been made, the withdrawal will be fully executed in a few business days and in the meantime, the order status will be Pending in the portfolio. The money will be transferred to the selected bank account.
To start a withdrawal, make a POST request to the following endpoint with the amount in the request body:
Create Withdrawal
POST /v1/investment/etfmatic/portfolios/{portfolioId}/withdrawals
Path Parameters
| Name | Type | Description |
|---|---|---|
portfolioId* | String | id of the portfolio from where the withdraw will be processed |
Request Body
| Name | Type | Description |
|---|---|---|
amount* | number | amount number |
The response will contain a withdrawal id and by which you can get the details of the withdrawal.
Get Withdrawal List
A client can have more than one withdrawal, and to get the list of the withdrawals, make a GET request to the following endpoint to get the list. Keep in mind that the response will not contain every detail but if you want the details of a withdrawal, see the next section.
Get Withdrawal List
GET /v1/investment/etfmatic/portfolios/{portfolioId}/withdrawals
Path Parameters
| Name | Type | Description |
|---|---|---|
portfolioId | String | id of the portfolio that the withdrawal is from |
Status
The status of the withdrawal could be the following:
CREATED
ACCEPTED
REJECTED
CANCELLED
UNCLEARED
CLEARED
Get Withdrawal Details
After creating a withdrawal, you can make a GET request with the withdrawal id to see the withdrawal details, such as the status, amount, currency, requested date, etc.
Get Withdrawal
GET /v1/investment/etfmatic/portfolios/{portfolioId}/withdrawals/:withdrawalId
Path Parameters
| Name | Type | Description |
|---|---|---|
portfolioId* | String | id of the portfolio that the withdrawal is from |
withdrawalId* | String | id of the withdrawal |
Delete Withdrawal
A withdrawal can be deleted only before it is accepted or rejected. If the client wants to delete the withdrawal then make a DELETE request with the withdrawal id. Note that you cannot delete a withdrawal once it is accepted.
Delete Withdrawal
DELETE /v1/investment/etfmatic/portfolios/{portfolioId}/withdrawals/{withdrawalId}
Path Parameters
| Name | Type | Description |
|---|---|---|
portfolioId* | String | id of the portfolio that the withdrawal is from |
withdrawalId* | String | id of the withdrawal |
Last updated